Wire EDM being a totally new machining process, nobody really
knew what could be done with it, where its limits were, etc. This caused a lot
of questions, quite often repeated, asked by the prospective customers and
curious people alike. The most common question asked in the very early stages
was: "can the wire be used again"? This question was quite resolutely
answered with "NO", even though later on, a Chinese model of wire EDM
machine came on the market, unwinding and winding a wire at very high speed
between two reels, inverting the wire direction once the end of it was reached.
This allowed a multiple use of the wire, obviously reducing the final accuracy
of the cut components.
During the first discussions with the interested parties, the actual cost of the
wire as tool was compared to conventional tools in other processes, including
these costs in the actual hourly rates for the whole installation. This value
was way below those of conventional tools, taking into account the pre-setting,
re-sharpening, inventory costs, etc., used in other manufacturing processes.
![]()
![]()
![]()
![]()
![]()
![]()
![]()
![]()
One of the first unconventional applications arrived at the
demonstration room one day in the shape of a "stone", in a protective
package, sent in by a Swiss institute. This strange object posed a number of
questions to the personnel occupied with the tests. After examining the object
more accurately, a small incision could be detected at one end. After a series
of questions at the institute, it was finally known that the "stone"
was actually a small meteorite, and the incision had been produced with a
conventional metal saw, wearing off three brand new blades. The request
consisted in cutting the meteorite into two halves, as flat as possible, so that
the composition of single elements could bee determined by spectrographic
analysis after having polished the surfaces.
The actual cutting was the smallest of the problems, as the real challenge was
the mounting of such an oddly shaped object on the workpiece table. Conventional
workpieces were normally ground parallel, and therefore could be clamped on the
table by the standard accessories. With the meteorite, this was not possible,
there was no such surface enabling normal clamping. After quite some
brainstorming, it was decided to hold the meteorite in place by adding some
pieces of lead, which adapted their shapes to the surface of the
"workpiece" by applying pressure on the clamps. An inconvenient
of this method consisted in the poor electrical conductivity properties of lead.
As the power needed for the process had to be applied to the workpiece as well
as the wire, some thin copper strips, connected to the power source, were placed
between the meteorite and the lead pieces.
When the meteorite was placed more or less satisfactorily on the workpiece
table, the next challenge consisted in finding the appropriate technology or
settings to be used for the cut, up to then, only known materials such as steel,
tungsten carbide, aluminum, brass and others had been cut, here, the material
was really exotic. During the first trial cuts, mostly when the wire was not yet
completely in the workpiece, the process caused an infinity of multicolored
sparks, like a firework, producing hissing sounds in all possible frequencies
and a multitude of wire breaks. Finally the two halves could be unclamped and
sent back to the institute, again carefully protected within the parcel.
![]()
![]()
![]()
![]()
![]()
![]()
![]()
![]()
The new technology obviously also triggered the imagination of the machine operators, which imagined the wildest shapes to be programmed and cut whenever the machine was not used for more serious activities.

|
|
A cut name |
The first of these fantasies was most likely the cut of the name of the operator, in all imaginable variations and in any material that was available. These ideas were realized when the machine was occupied and cutting some sample part for customers.
The first sample, which was cut in hundreds if not thousands, was definitely the shape of Switzerland, with the lettering "AGIE" included in its center. This program had to be created with the most primitive tools, no digitizing machines were available at those times. The outline of the country, a map as large as could be found, was covered by grid-lined paper, in order to determine the various changes in directions and distances to be programmed. This was done in an enlarged scale, so that each dimension had to be divided by that factor before being punched into the tape.
This shape was then cut in the demonstration room, during nights and weekends, on exhibitions and machine tool shows, etc. It became a much requested publicity item, justifying the production of special clamping devices, enabling the cutting of the parts in a "sandwich", with several sheets of metal pressed together in the fixture.

|
|
The "golden" Switzerland |
When a "round" year since the establishment of AGIE was nearing, one of the directors had the idea of presenting the main share holders with a special gift: the outline of Switzerland, enclosing the lettering AGIE within, with the start of the cut placed as closely as possible to Losone (quite fortunately, this town is located just a few kilometers from the Italian border). Sure, these components had been cut over 1'000 times, but in pure gold, approximately 2 mm thick? The necessary sheets of the valuable material were procured, which obviously were brought back to a safe every evening, when the normal working shift was over. The necessary amount of "Switzerlands" were cut and polished, separately glued on a polished and slanted column of granite, and ceremonially presented to the share holders at the next meeting.
![]()
![]()
![]()
![]()
![]()
![]()
![]()
![]()
As mentioned earlier, the fantasy of the operators was, in the truest sense of the word, borderless, similar shapes were programmed with the outline of the countries of the sales organizations, of course including the name of the company distributing the wire EDM machines in that country.
Some application engineers also had the idea to imagine, program and cut some
kind of jigsaw puzzles, with the names of their company, the single states of
the Union and a multitude of others.
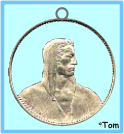
One operator created a particular trinket, probably not totally legal: by taking
a coin circulating as normal tender, in the first case it was a 5 Fr. coin, he
practiced a threading hole and cut the material around the torso of William
Tell, creating a hollow space between the body and the external circular shape.
The biggest problem was the accurate positioning of the coin, so that the cut
would not damage "Willy's" head.
Once the cut was terminated, a small ring was soldered on top of the now hollow
ring, in order to be proudly worn as a pendant on a necklace.

|
|
|
Original 5 Fr. |
The result |
This became the operator's present for his family and friends, reserving an even more precious pendant for his wife and himself: he used the commemorative 25 Fr. gold coin, lovingly called "Gold-Vreneli" in Switzerland, to cut around the head of "Helvetia" and thus creating a more precious remembrance.

|

|
|
Original "Vreneli" |
The result |
![]()
![]()
![]()
![]()
![]()
![]()
![]()
![]()
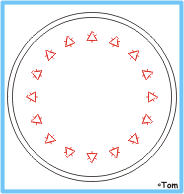
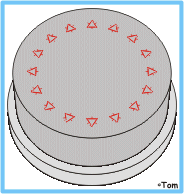
One very special challenge came one day from a company occupied in the production of artificial fibers, they wanted to cut specially shaped openings into their spinnerets.
 |
 |
|
| The spinneret | Front view | The approximate profile |
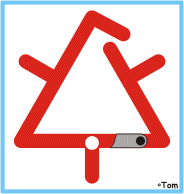
Some spinnerets had to be cut, with extremely small profiles
and narrow cutting widths. The shape itself, i.e. the profile of the opening,
represented no major challenge for the programmer. The biggest problem consisted
in the threading of the wire and the execution of the cut itself. The spinneret
consisted of a circular plate, approximately 10 mm thick, with a flange of about
2 mm. The shape had to be produced 16 times, distributed on a circle, the
starting holes had already been made, said the prospective customer. But were?
After closer examination of the workpiece, the tiny holes could be made out on
the polished surface. They were 0.05 mm in diameter, and placed in a position
were the largest amount of material was available within the profile (see above
image, to the right).
OK, all of this was not so difficult, it was just in another dimension of the
previously cut workpieces. The wires used up to then were made of copper, and
the smallest diameter was 0.1 mm, below these dimensions, no experience existed.
The workpiece was widened at the bottom, creating a hollow space under each of
the profiles that had to be cut. These blind holes were drilled so that the
height to be cut was a mere 1 mm. The wire to be used, made of molybdenum and
having a diameter of 0.03 mm, had a nasty habit, it "remembered" the
curvature of the spool on which it was delivered, so that the wire was never
really straight, making the threading operation a real nightmare, also due to
the fact that the wire moved from the bottom through the workpiece, and the
threading hole was not visible because of blind hole surrounding the profile.
Once the wire was finally threaded in one hole, it still had to be aligned in
its center, to avoid contact and short-circuit with the workpiece, before the
actual cutting could start. At these times, no automatic centering function was
available on the machines, this had to be done manually by means of the hand wheels.
As helping device, a circuit tester was used, emitting a beeping noise whenever
the circuit was closed, but the operator did not know, in which direction the
axes had to be moved to center the wire in the hole. Well, this operation, in
the mentioned case, had to be executed 16 times, the actual cutting of the
profile was done in a much shorter time.
![]()
![]()
![]()
![]()
![]()
![]()
![]()
![]()
In different domains, even if quite similar in the
application, other problems had to be mastered. An industry which adopted wire
EDM almost since the beginning, was the production of aluminum profiles, or
rather the manufacturing of the extrusion dies necessary for it.
Here as well, circular plates are used, containing the desired profiles
distributed on the surface in various orientations if the profile itself was
small enough. Here as well, the workpiece was hollowed out at one side, normally
the bottom, creating an approximate envelop of the profile, and leaving just a
few millimeters of material to be cut. If analyzed more closely, there are quite
a few differences between the production of spinnerets and of extrusion dies for
aluminum. The shapes of the profiles to be cut are normally larger by magnitudes
and require machining tolerances which are more generous. The wire diameters to
be used are much bigger, the threading holes much wider and the whole workpiece
is much, much heavier than the spinnerets.
The table of the DEM-15 supporting the workpiece was designed for maximum
workpiece weights of approximately 10 kg, the extrusion dies to be produced were
quite a bit heavier. One manufacturer had a simple but quite efficient solution
to avoid distortions in the profiles and damage to the guides of the Y-axis of
the machine. After having placed the workpiece on the table, generally with a
support placed under it, an attachment was fixed on the part of the die which
was overhanging. To that clamp, a steel wire was connected, which was led over a
pulley attached to the ceiling above the working area, and having a
counter-weight attached to it, to compensate as much as possible for the
excessive weight.
A curious but quite efficient method to compensate for the "shortcomings" of the machine, other solutions of the same nature followed from other fields of application, such as specially designed workpiece holders, either to place the part to be cut at an angle or on a divisor to repeat the shape along a circle, special fixtures which allowed the workpieces to be cut in several clampings if the travel of the machine was smaller than the length of the profile, etc., etc,.....